Software Guide, Reviews & Download for Windows OS
SoftGets provides Windows Latest News, how to articles & Free Software download.
SoftGets provides Windows Latest News, how to articles & Free Software download.
SoftGets provides Windows Latest News, how to articles & Free Software download.
Windows XP is one of the great OS by Microsoft. It was released as a successor of Windows ME and was later succeeded by Windows Vista. The OS was used for more than 10+ years. It was released in 2001 and was supported till 2016. Microsoft has experienced ups and downs and Windows XP was one of its biggest hits. And here you are going to set up a Windows XP Emulator for Windows 10 & 11.
There are different reasons why you will need to emulate Windows XP instead of using the OS directly. One of the first reasons is the EOL of Windows XP. As we mentioned before, Windows XP has reached its end and is no longer supported by Microsoft.
This way, you will be able to use Windows XP without putting your system at risk.
NOTE: since there is no Windows XP emulator, the only way to use Windows XP on Windows 10 is to use virtual machines. For creating one, you will need third-party applications such as VMware or VirtualBox.

For running Windows XP, you are going to check whether you have enabled the virtualization feature or not. For this, you will check your system details, and there you find the virtualization section.
If you find it enabled then you will continue the process below, else will enable it. Begin by going to your BIOS, there you will check for the virtualization option, enable it then save changes, and exit BIOS.
Now you will open Turn Windows features on or off. Here you are going to navigate and find Hyper-V, check the boxes besides, and click on OK.
Now you are going to download Windows XP as your first task. You will download Windows XP in ISO file. This ISO file will be later used inside the VirtualBox and do the installation.
While downloading the setup file, make sure you are downloading it from a reliable source. As using an infected file can put your system at risk.
It is quite common to find Windows XP in zip or rar file. Here you are going to use a third-party application like WinRAR to extract all the files inside. Once the files are extracted then you will continue with the next step below.
Instead of VirtualBox, you can also use other applications such as VMware (workstation or player) or Parallels. There is also the built-in option of Hyper-V too. Users can also use Hyper-V with Windows XP inside.
Since VirtualBox is the most common one, we are using VirtualBox. First, you will download VirtualBox from officials.
Then you are going to install it on your system. Since the installation of VirtualBox on Windows is quite straightforward, we have left that for you. Now let’s continue with creating a new virtual machine.
For creating a new virtual machine for Windows XP, you are going to run VirtualBox first. After the installation got completed, you will find the app shortcut on your desktop.
Double click on it and the application will run.

Now you are going to click on New at the top. This will open a new window with new options, select the options below;
Name: Windows XP
Machine Folder: virtual machine location*
Type: Microsoft Windows
Version: Windows XP (32-bit/64-bit)

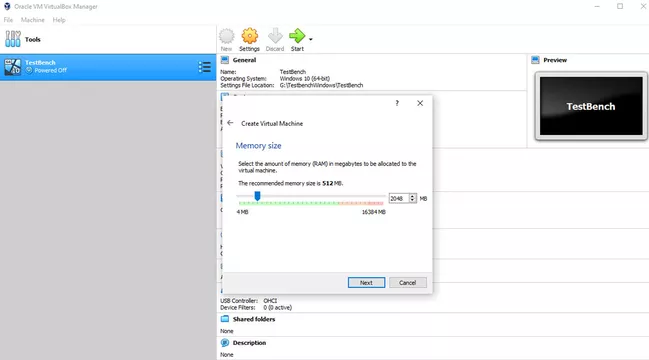
The 32-bit or 64-bit is totally dependent on which version of Windows XP you are using. Continue by selecting your RAM memory in Memory size and click on Next.
You will select Create a virtual hard disk now option and click on Create.
Now you will be asked for the location of your virtual machine. Select a location that is accessible to you and your virtual machine size should be around 20+ GB. Once all the options are selected then you will click on Create.

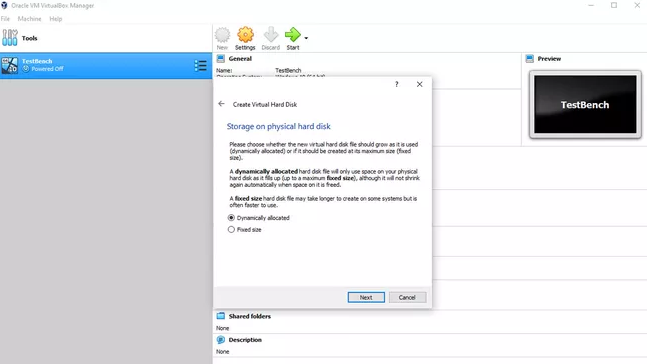
In this step, some recommend selecting Dynamically allocated while others prefer Fixed size. however; we would recommend you use Fixed size and click on Create.
Reaching this point indicates that you have created a virtual machine for your Windows. Instead of using your Windows XP on Windows 10 or Windows 11, you are going to configure it first.
Without configuring your virtual machine, you won’t be able to run the virtual machine or will experience different errors if the VM started.
After creating a virtual machine, you will see Customize Hardware option or can click on Finish. You can click on Finish and select your VM, click on the Settings option. Or you will click on Customize Hardware option to directly customize your VM.
No matter which option you chose, you are going to open the VM Settings window.
Here you are going to configure a few things and then you will run your VM.
First, you are going to make sure that you have selected half of your processor for your VM. Then you are going to select options in Storage.
Make sure, you have selected Optical and Hard Disk options.
Check other options in General, Audio, and Display. Change the options according to your use and apply the changes to your VM. Don’t forget to select your Windows XP ISO file in Settings.
Once all the changes are made to the VM, then you are going to run VM. From here on, all the steps will be like installing any Windows XP on a PC.
Begin by starting your VM. Like any other PC, you will be asked to press any key to boot…
Press any key from your keyboard and your system will boot the ISO file. Now you are going to install Windows XP.
You will be asked to a local Administrator account on your VM and will be also asked to give it a password. After the installation, you might not hear any sound or experience bad graphics.
To fix it, you are going to install all the necessary Windows XP drivers. Then you will install the VirtualBox extension pack if the graphics or sound are not fixed.
Once all the stages are passed then you will use your Windows XP on Windows 10.
To close the VM, you are going to use the Shut Down option. If you want to start Windows XP, then you will start your VM. There is no further work for you to do, this is a simple and easy way to use Windows XP on any Windows.